30 Aug 2015
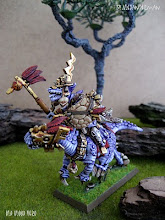
Dragon Prince of Caledor Done
Here's the Dragon Prince with final high lights, and basing done...
It was great to paint one of these classics. Four more to go, to get a unit of five done... but now I got another commission to make. I'll be back with that shortly. Bye now!
23 Aug 2015
Dragon Princes of Caledor, GW -93
Hi there! I'm taking a little break from scenery building and commissions, and doing little painting of my own...
Inspired by my disappointment towards GW, for "ending" the Warhammer Fantasy Battle, and making the Age of Sigmar, I dusted my good old third edition book, and started reading the basic rules.
And that was leading to finding myself opening my High Elf boxes that have been in the back of my miniature cupboard for a long time now... I'm thinking of doing myself a little "Old Hammer" High Elf host just for fun, even if I know that I wont be having any green light from my gaming crew with the 3rd edition :) I'm pretty sure we're gonna be sticking to the 8th edition. We'll see...
First box to be opened was the good old Dragon Princes of Caledor. I have allways adored these models, and the paint job on the cover of the box is really inspiring...
So I got the first of them assembled...
And primed (Dragon Red, Army Painter).
Here's the first layers (Warpstone Glow, Celestra Grey, and Averland Sunset).
Wash with Agrax Earthshade.
And here's some first high lights... (Evil Sunz Scarlet, Troll Slayer Orange and Moot Green) Sorry about bad pics.
More to come soon... Bye now!
Inspired by my disappointment towards GW, for "ending" the Warhammer Fantasy Battle, and making the Age of Sigmar, I dusted my good old third edition book, and started reading the basic rules.
And that was leading to finding myself opening my High Elf boxes that have been in the back of my miniature cupboard for a long time now... I'm thinking of doing myself a little "Old Hammer" High Elf host just for fun, even if I know that I wont be having any green light from my gaming crew with the 3rd edition :) I'm pretty sure we're gonna be sticking to the 8th edition. We'll see...
First box to be opened was the good old Dragon Princes of Caledor. I have allways adored these models, and the paint job on the cover of the box is really inspiring...
So I got the first of them assembled...
And primed (Dragon Red, Army Painter).
Here's the first layers (Warpstone Glow, Celestra Grey, and Averland Sunset).
Wash with Agrax Earthshade.
And here's some first high lights... (Evil Sunz Scarlet, Troll Slayer Orange and Moot Green) Sorry about bad pics.
More to come soon... Bye now!
12 Aug 2015
Reaper Bones Ogre
Hello! I'm a little short on the hobby time again... But here's a quick posting of a Reaper Bones Ogre that I made as a comission, for RPG use. In this case it's used in GURPS-fantasy.
Here's the poor ogre hacked to pieces... I was asked to get rid of the shield and heavy mace. In GURPS the character uses two handed great axe, and has a smaller axe as a "back up" weapon...
Well... here it is. I used bitz from GW black orcs regiment box and gave it the paint job.
Mini painted up nicely. "Bones" details were just fine. Only downside was that the glue drying time seems to be quite long with the Bones plastic... But I can live with that, when I look at the Bones prices :) Bye Now!
Here's the poor ogre hacked to pieces... I was asked to get rid of the shield and heavy mace. In GURPS the character uses two handed great axe, and has a smaller axe as a "back up" weapon...
Well... here it is. I used bitz from GW black orcs regiment box and gave it the paint job.
Mini painted up nicely. "Bones" details were just fine. Only downside was that the glue drying time seems to be quite long with the Bones plastic... But I can live with that, when I look at the Bones prices :) Bye Now!
20 Jul 2015
Barrels Part II: All Done
Hello there! Got nine more barrels done. Here's some painting pics...
Well... Here's a pic before painting first :)
Ok... first I primed the barrels with two different colors, Skrag Brown and Steel Legion Brown (to make older looking barrels). Metal parts were painted with Boltgun Metal.
Washed the barrels with Nuln Oil all the way...
Then I painted some wood looking patterns with the prime colors again...
Added white to the prime colors and painted high lights on the patterns.
Finally I high lighted the metal parts with Runefang Steel... And made some rusty spots to the "old barrels".
Ok, that's nice... But what do I do with Ten barrels. Can't I get along with five? Well...
Now I can make a pyramid of barrels...
A wall of barrels... (for defend the beer scenario)
Or a wine storage for taverns :) So there you go. Barrels done and done. Bye now!
Well... Here's a pic before painting first :)
Ok... first I primed the barrels with two different colors, Skrag Brown and Steel Legion Brown (to make older looking barrels). Metal parts were painted with Boltgun Metal.
Washed the barrels with Nuln Oil all the way...
Then I painted some wood looking patterns with the prime colors again...
Added white to the prime colors and painted high lights on the patterns.
Finally I high lighted the metal parts with Runefang Steel... And made some rusty spots to the "old barrels".
Ok, that's nice... But what do I do with Ten barrels. Can't I get along with five? Well...
Now I can make a pyramid of barrels...
A wall of barrels... (for defend the beer scenario)
Or a wine storage for taverns :) So there you go. Barrels done and done. Bye now!
9 Jul 2015
Barrels out of Corrugated Cardboard
Hi there! For starters, I found this amazing tutorial for making barrels from youtube... https://www.youtube.com/watch?v=P5ULCZOawG8 Check it out! And there are many other crafting tips from the same DM... Really cool stuff.
This is just a posting of how my barrel came out, using DM Scotty's way. Here's some pics.
I started out marking the lines to the corrugated cardboard. Here's material for ten barrels...
Then I cut the cardboard for ten pieces, all having twelve corrugations. Enough to bend it to a barrel.
At this point I used scissors to cut quarter of an inch from both edges of the cardboard... You can see the two drawn lines that worked as a guide markers. Then I used craft knife to cut the vertical lines only from other side of the cardboard. It's important not to cut too deep, or all the way through.
Then I bent the cardboard to a barrel shape, and used some hot glue to stick up the edges together.
Then the bottom in place. Its cutted out from the same cardboard material, 0,5 inches diameter. And before glueing the top cover of the barrel, I glued a nob inside the barrel, to give it some weight and balance.
Then cover...And the barrels wooden parts are ready.
These white stripes were cutted out of carton. Then bent around the barrel, attached with white glue.
And finally... paint job done here. I'm very happy with the result, and amazed how easy that was to make. This is a some low cost barrel :) Now I'm gonna start my barrel factory and make nine more.
And it's even better looking in a relevant enviroment. Go and see the real tutorial and other DM's
crafting tips from youtube... Thank you DM Scotty!
This is just a posting of how my barrel came out, using DM Scotty's way. Here's some pics.
I started out marking the lines to the corrugated cardboard. Here's material for ten barrels...
Then I cut the cardboard for ten pieces, all having twelve corrugations. Enough to bend it to a barrel.
At this point I used scissors to cut quarter of an inch from both edges of the cardboard... You can see the two drawn lines that worked as a guide markers. Then I used craft knife to cut the vertical lines only from other side of the cardboard. It's important not to cut too deep, or all the way through.
Then I bent the cardboard to a barrel shape, and used some hot glue to stick up the edges together.
Then the bottom in place. Its cutted out from the same cardboard material, 0,5 inches diameter. And before glueing the top cover of the barrel, I glued a nob inside the barrel, to give it some weight and balance.
Then cover...And the barrels wooden parts are ready.
These white stripes were cutted out of carton. Then bent around the barrel, attached with white glue.
And finally... paint job done here. I'm very happy with the result, and amazed how easy that was to make. This is a some low cost barrel :) Now I'm gonna start my barrel factory and make nine more.
And it's even better looking in a relevant enviroment. Go and see the real tutorial and other DM's
crafting tips from youtube... Thank you DM Scotty!
Subscribe to:
Posts (Atom)